


")


. Buy It or Skip It?")


: Ingredients, Nutrition Table, Pros and Cons")

A dog can choke in seconds. A toy piece, a treat, a bone shard, or even a stick can block airflow fast. Then panic kicks in, and everything feels loud and messy. That is normal. Still, you can do the right things, even when you feel stressed.
This guide gives you clear steps for dog choking first aid and dog CPR. It focuses on the first 60 seconds, then it shows what to do next until you reach a veterinarian. Keep it simple. Keep moving. Most of all, start.
Start with safety. Prevent a bite first
A scared dog can bite, even a gentle dog. Pain and fear change behavior fast. So start by protecting your hands and face.
- Keep your face away from the mouth
- Use a calm voice
- Ask someone nearby to call the emergency vet right now
- Do not put a muzzle on a dog that struggles to breathe or gags
If you are alone, call the vet on speaker, then begin first aid right away.
Decide fast. Is it choking or collapse?
Look for these choking signs:
- Panic, wide eyes, pacing
- Pawing at the mouth
- Loud breathing, wheezing, high-pitched sounds
- Drooling and gagging
- Coughing that does not clear the problem
- Blue, gray, or very pale gums
- Sudden collapse
Now sort it into one of two paths:
Path A. Your dog is awake and fighting for air
Treat it as choking first.
Path B. Your dog is limp or not breathing
Start CPR right now.
Do not freeze and “wait to see.” Pick a path and act.
The first 60 seconds plan (do this in order)
0 to 10 seconds. Check breathing and gum color
- Tell someone: “Call the emergency vet now.”
- Look at the gums. Pink is better. Blue, gray, or white means a crisis.
- Check breathing. Watch the chest. Feel air from the nose.
If your dog cannot breathe, the plan moves fast. So move fast too.
10 to 30 seconds. Open the mouth and look
- Open the mouth.
- Pull the tongue forward.
- Look for the object.
Only grab something you can see and hold. Do not sweep deep into the throat. You can push the object farther down, and that makes it worse.
30 to 60 seconds. Act now
- Awake and choking. Start thrusts and back blows.
- Not breathing. Start CPR cycles.
Dog choking first aid for an awake dog
This is the moment that feels scary. Your dog may thrash, cough, and panic. Still, your steps can stay calm and steady.
Step 1. Remove a visible object
Open the mouth. Pull the tongue forward. Look again.
If you see a piece of food or a toy, pinch it and pull it out. Use a quick, firm motion.
If you do not see anything, do not guess. Move on right away.
Step 2. Do 5 abdominal thrusts (the dog Heimlich)
Abdominal thrusts push air up from the lungs. That air can force the object out. So the goal is strong, fast pressure.
Medium and large dogs that can stand
- Stand behind your dog
- Wrap your arms under the ribcage
- Make a fist
- Place your fist on the soft spot under the ribs
- Thrust up and forward, fast and firm
- Do 5 thrusts
Large dogs that cannot stand
- Lay your dog on the side
- Put one hand on the back to steady the body
- Use the other hand to push the abdomen up and in, behind the ribs
- Do 5 thrusts
Small dogs
- Hold your dog with the back against your chest
- Place two fingers or a small fist under the ribs
- Push up and in 5 times
These thrusts should feel “real.” Gentle presses rarely work.
Step 3. Head down, hips up
Next, use gravity.
- Lift the back legs so the head points down
- For a heavy dog, lift the hips and keep the front paws on the ground
Hold this position for a moment. Then check the mouth again. Sometimes the object shifts, and you can grab it right away.
Step 4. Give 5 sharp back blows
Now use the flat part of your palm.
- Strike between the shoulder blades
- Do 5 sharp blows
Aim for quick, confident hits. Do not tap lightly. You want a real jolt.
Step 5. Repeat the cycle until breathing returns
Keep repeating this loop:
- Mouth check
- 5 abdominal thrusts
- Head down
- 5 back blows
Then check breathing again.
If your dog starts breathing normally, stop thrusts and let them recover. Still, go to the vet after a choking event. Throat irritation can linger, and some dogs cough for hours after.
Your dog went limp. Switch to CPR fast
A choking dog can pass out from low oxygen. This is the moment where people lose time. So treat it as urgent and start CPR steps right away.
Step 1. Put your dog on a firm surface
Lay your dog on the side on the floor. A soft bed makes compressions weaker.
Straighten the neck in a natural line. Pull the tongue forward a little.
Step 2. Check the mouth again
Open the mouth and look. Remove a visible object you can grasp. Then close the mouth again.
Step 3. Give 2 rescue breaths
Rescue breaths can move air into the lungs.
- Close the mouth
- Seal your mouth over the nose
- Blow until the chest rises
- Give 2 breaths
If the chest does not rise, reposition the head and try again. The airway may still be blocked, so you may need another quick mouth check.
Step 4. Start chest compressions right away
After the breaths, begin compressions. Do not delay.
Push hard. Push fast. Keep the rhythm.
Dog CPR. Simple steps you can follow under stress
Dog CPR has two parts:
- chest compressions
- rescue breaths
Keep the sequence steady. You do not need fancy technique. You need consistent action.
Step 1. Hand placement
Most dogs do best on the side.
- Place your hands on the widest part of the chest
- Stack one hand over the other
- Lock your elbows
- Push straight down
For tiny dogs, use one hand or two fingers, based on body size.
For barrel-chested dogs, some owners do better with the dog on the back and pressure on the middle of the chest. Still, do not overthink it. Start compressions in the best position you can manage.
Step 2. Compression rate and depth
Use this rhythm:
- Rate: 100 to 120 compressions per minute
- Depth: about one third to one half of the chest width
- Let the chest rise back up after every push
A simple timing trick helps here. Press about twice per second.
Step 3. Use the 30:2 cycle
When you work alone, follow this pattern:
- 30 compressions
- 2 breaths
- Repeat
Each breath should last about one second. Stop when the chest rises.
If you have a second person, one can do compressions and the other can do breaths. That teamwork helps a lot, and it keeps the pace steadier.
Step 4. Recheck every 2 minutes
After about 2 minutes of CPR, do a quick check:
- Look for breathing
- Feel for a heartbeat by placing a hand on the chest behind the left elbow
Keep checks short. If there is no breathing, start compressions again right away.
Step 5. Keep going during transport
If your dog does not recover quickly, start moving to the vet.
If you have another adult, one drives and one continues CPR in the back seat. If you are alone, do a few cycles, then transport. Call the clinic on speaker as you move.
What improvement can look like
Sometimes CPR works fast. Other times you see small signs first.
Watch for:
- The chest moves with breaths
- The gums shift closer to pink
- Your dog swallows or coughs
- The eyes blink
- The heartbeat feels stronger
If your dog coughs up the object, keep the head low for a moment. Let the dog clear the mouth and throat. Then head to the vet anyway.
After the object comes out. Go to a vet
A dog may look “fine” after choking. Still, throat tissue can be irritated. Tiny scraps can go into the airway too. So a vet check matters.
Watch for these warning signs on the way:
- Ongoing cough
- Noisy breathing
- Fast breathing
- Weakness or collapse
- Drooling that does not stop
- Vomiting after the event
- Blue or pale gums
Tell the clinic it was a choking incident. Mention what your dog choked on.
Common mistakes during dog choking first aid
Reaching deep into the throat
Do not sweep deep with a finger. You can push the object farther down.
Stopping too soon
Keep going until breathing returns or you reach a vet team. People often stop after one try, and that wastes time.
Using weak compressions
Light pushes do not move enough blood. So push firm and steady.
Bending elbows during compressions
Straight arms give better pressure and help you hold the rhythm.
Losing the pace
Speed matters. Aim for two compressions per second, then keep going.
A one-minute practice drill (do this once a month)
Practice helps you stay calm later. It does not need gear.
- Find the widest part of your dog’s chest with your hands.
- Count 30 compressions at a steady pace.
- Practice the mouth check in your head. Open, tongue forward, look.
- Practice the choking loop in your head. Thrusts, head down, back blows.
Then save your emergency vet number in your phone contacts. Put it near the top with a clear label like “Emergency Vet Now.”
Prevention tips that can lower choking risk
You cannot stop every accident, but small habits reduce risk.
- Choose chew toys that match your dog’s size
- Replace damaged toys that crack or shred
- Supervise chew time with new treats
- Avoid small round balls that can seal the airway
- Keep children’s toys off the floor
- Use a slow-feed bowl for fast eaters
- Do not let your dog sprint with food in the mouth
Training helps too. A strong “drop it” and “leave it” can stop the worst moments before they start. Dogs can pick up words faster than many people expect, and some even learn by listening to speech around them. You can read more about that here: dogs can learn new words just by listening.
Walk gear can play a part as well. A dog that pulls hard can grab trash, bones, or sticks before you even see them. A safer, better-fitting harness can give you more control, and it can make walks calmer too. Here is a helpful guide: vet-recommended dog harnesses that help with pulling.
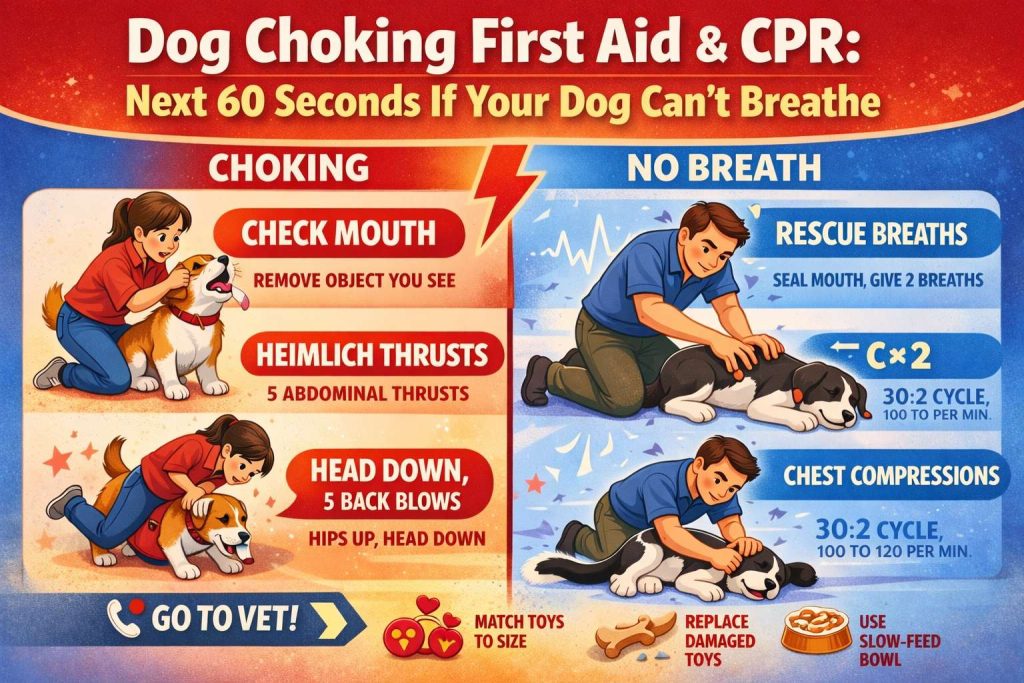
Quick cheat sheet. Memorize this
Awake and choking
- Mouth check, remove visible object
- 5 abdominal thrusts
- Head down
- 5 back blows
- Repeat
Collapsed or not breathing
- Mouth check, remove visible object
- 2 breaths
- 30 compressions
- 2 breaths
- Keep a fast rhythm
You do not need perfect technique. You need action within seconds.
